

Copy Time Entries to Another Day in the CalendarView
To copy a time entry to another day in the CalendarView, do the following:
- From the Navigation menu select: Time > CalendarViewThis view will display the timesheet in a chronological order. It holds all of the same functions as the standard Day view but offers alternative methods for Merging time entries. You can also drag items to increase / decrease the duration..
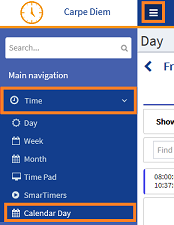
- This will open the CalendarView.
- Click on the time entry that is to be copied to another day, this will display the COPY button at the bottom of the CalendarView.
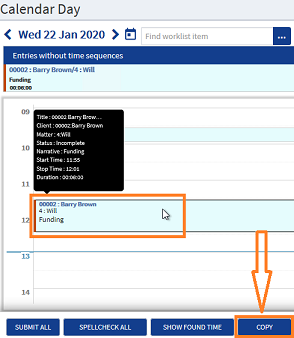
- Click the COPY button to display the Copy entries to date form.
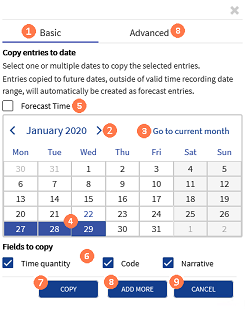
 Basic tab : The default tab that opens is the Basic tab.
 Advanced tab : If the date being copied to is not the current month, click the < > buttons to scroll the calendar to the required month.
 Date picker : Alternatively, click the Go to current month text to quick change the calendar.
 Date selection : Click on the required date(s) in the calendar to select them. They will highlight in blue to show that they are selected.
 Forecast Time check-box : If the date(s) selected in the calendar are in the future, the Forecast timeTime in the future that has not yet happened but is planned. This will assist you in forward planning your work and lets your manager know when you are available. Forecast time can be converted into a Time entry when the work is completed. check-box will be displayed above the calendar. To copy the time as Forecast time, click the check-box.
 Fields to copy check-boxes : There are 3 options which are all selected by default to copy specific details to the new entries. Where any of these options are not required, click the checkbox(s) to deselect them.
 COPY button : If no additional details are required, click the COPY button. The form will close and the CalendarView will refresh.
 ADD MORE button : If additional details are required, click the ADD MORE button or the Advanced tab. (see step 5 below)
 CANCEL button : If the copy is not required, click the CANCEL button to close the copy form and return to the CalendarView.
- If either the ADD MORE button or Advanced tab is clicked, then the time entries can also be added to additional TimekeeperThis is the person who is working on behalf of the client. They are also known as a Fee Earner. / Groups.
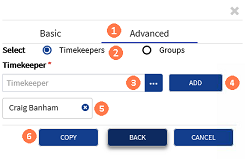
Advanced tab : Indicates that the Advanced tab is selected. If this tab is not required, either click the BACK button or the Basic tab.
Select : By default the Timekeeper option is selected to copy the time entry(s) to other timekeepers, this can be changed to be a group of timekeepers by selecting the Groups option. The pick-list in step 3 below will update to show the groups the current user has access to.
Select name field : To select a Timekeeper or Group, click the ellipsis button to display the available timekeepers or groups, then click the required name to select it.
ADD button : Click the ADD button to complete the Timekeeper or Group selection. This will display the selected timekeeper or group name below the pick-list. Repeat steps 3 & 4 until all of the required selections are made.
Names selected : If any timekeepers or groups have been selected but are not required, click the 'X' button next to their name displayed below the pick-list field.
COPY / BACK & CANCEL buttons : Once the selections have been made then either, click the COPY button to copy the time entry(s) and close the form, click the BACK button to review the details in the Basic tab and then click COPY from there, or if the copy is not required, click the CANCEL button to close the form and return to the CalendarView.
