|
This report is designed to allow s and Users to find any Forecast Time that they have recorded for a specific time period.
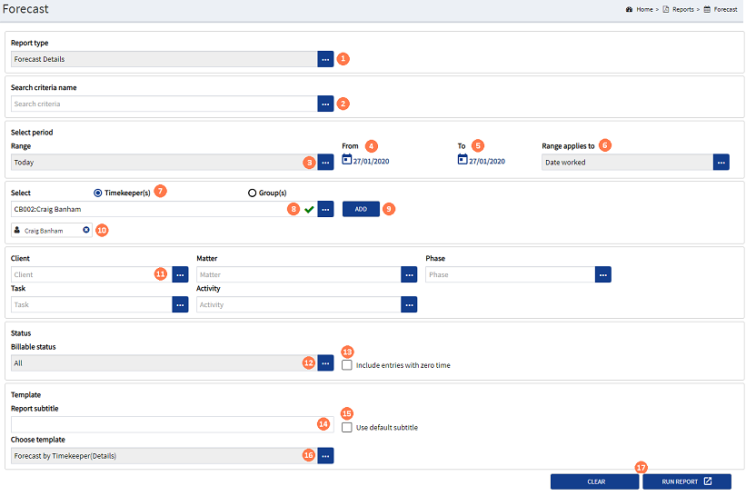
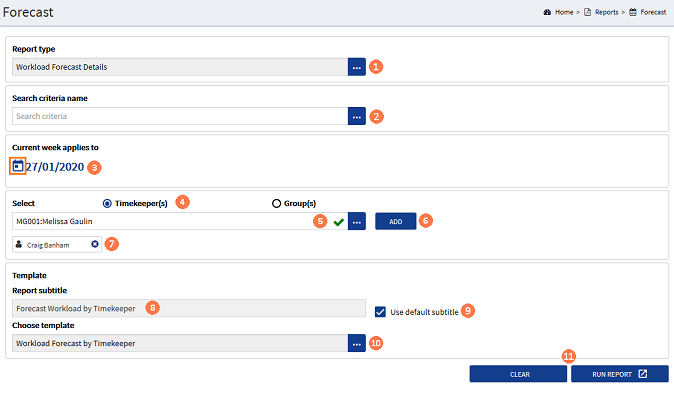
 Report type : Retain the default setting as Forecast Details. Report type : Retain the default setting as Forecast Details.
 Search criteria name : Where a report has been previously run and saved, then those reports are listed here. Click the ellipsis button to display the drop-down list of report names. Click on the required entry to select it and populate the Forecast Time Report fields with the saved criteria. Alternatively, where a new report criteria is being defined and it may be required to run again in the future, then enter a name in this field. This will change the RUN REPORT button to show as SAVE and RUN REPORT. Search criteria name : Where a report has been previously run and saved, then those reports are listed here. Click the ellipsis button to display the drop-down list of report names. Click on the required entry to select it and populate the Forecast Time Report fields with the saved criteria. Alternatively, where a new report criteria is being defined and it may be required to run again in the future, then enter a name in this field. This will change the RUN REPORT button to show as SAVE and RUN REPORT.
 Select Period : Range : A date range must be selected to run the report. Click the ellipsis button to display the drop-down list of pre-set date ranges, then click on the required range to select it. Alternatively, select the CUSTOM option and then complete steps 4 and 5 below. Select Period : Range : A date range must be selected to run the report. Click the ellipsis button to display the drop-down list of pre-set date ranges, then click on the required range to select it. Alternatively, select the CUSTOM option and then complete steps 4 and 5 below.
 Select Period : From : Click the calendar button to display the pop-up calendar. Select the required date that the report range should capture data from. Select Period : From : Click the calendar button to display the pop-up calendar. Select the required date that the report range should capture data from.
 Select Period : To : Click the calendar button to display the pop-up calendar. Select the required date that the report range should capture data to. Select Period : To : Click the calendar button to display the pop-up calendar. Select the required date that the report range should capture data to.
 Select Period : Range applies to : Click the ellipsis button to display the pick-list options. Click on the option that the range should be applied to. Select Period : Range applies to : Click the ellipsis button to display the pick-list options. Click on the option that the range should be applied to.
 Select : Timekeeper / Group : The default option is set to Timekeeper, where the report should be run for a timekeeper group, click the Group option. This will automatically deselect the Timekeeper option. Select : Timekeeper / Group : The default option is set to Timekeeper, where the report should be run for a timekeeper group, click the Group option. This will automatically deselect the Timekeeper option.
 Select : Name : Click the ellipsis button to display the pick-list of names associated to the Timekeeper or Group that you have access to. Click on the required name to select it. Select : Name : Click the ellipsis button to display the pick-list of names associated to the Timekeeper or Group that you have access to. Click on the required name to select it.
 Select : ADD button : To confirm the name selected, click the ADD button. Multiple names can be selected if required, as such repeat steps 7 to 9 until all names have been selected and confirmed. Select : ADD button : To confirm the name selected, click the ADD button. Multiple names can be selected if required, as such repeat steps 7 to 9 until all names have been selected and confirmed.
 Select : Selected name : Where a name has been selected in error, click the 'X' in the name displayed below the pick-list. Select : Selected name : Where a name has been selected in error, click the 'X' in the name displayed below the pick-list.
 Client / Matter / UDF selection : To select a matter a client must first be selected. Click the ellipsis button in the field to display the pick-list, then click on the required Client to select it, then do the same in the field. Client / Matter / UDF selection : To select a matter a client must first be selected. Click the ellipsis button in the field to display the pick-list, then click on the required Client to select it, then do the same in the field.
To select options from the 's, click the ellipsis button to display the pick-list, then click on the required option to select it.
In each of these fields, only a single option can be selected. Selecting more options, will reduce the number of results returned in the report. Alternatively leave all or some of the fields blank to run the report against all client matters.
 Status : Billable status : This field defaults to All billable status, click the ellipsis button to display the pick-list and click on the required option to select it. Status : Billable status : This field defaults to All billable status, click the ellipsis button to display the pick-list and click on the required option to select it.
 Status : Include entries with zero time : Where forecast time with zero time is required, click this check-box to include those entries in the report results. Status : Include entries with zero time : Where forecast time with zero time is required, click this check-box to include those entries in the report results.
 Template : Report subtitle : You can enter a custom report subtitle here, rather than using the default one provided. Click in the field and enter the sub-title you would like displayed. Alternatively.. Template : Report subtitle : You can enter a custom report subtitle here, rather than using the default one provided. Click in the field and enter the sub-title you would like displayed. Alternatively..
 Template : Use default subtitle : Click this check-box to display the default subtitle in the report, rather than entering a custom one. This will populate the report subtitle field with the report subtitle text that will be displayed. Template : Use default subtitle : Click this check-box to display the default subtitle in the report, rather than entering a custom one. This will populate the report subtitle field with the report subtitle text that will be displayed.
 Template : Choose template : Click the ellipsis button to display the pick-list of defined templates, then click on the required option to select it. Template : Choose template : Click the ellipsis button to display the pick-list of defined templates, then click on the required option to select it.
 CLEAR / (SAVE and) RUN REPORT buttons : Once the Forecast report criteria has been defined, click the (SAVE and) RUN REPORT button. To run another report click the CLEAR button to clear all of the selected criteria. CLEAR / (SAVE and) RUN REPORT buttons : Once the Forecast report criteria has been defined, click the (SAVE and) RUN REPORT button. To run another report click the CLEAR button to clear all of the selected criteria.
|


 Forecast Time Report