

Add a Basic Time Entry in the CalendarView
- From the Navigation menu select: Time > CalendarViewThis view will display the timesheet in a chronological order. It holds all of the same functions as the standard Day view but offers alternative methods for Merging time entries. You can also drag items to increase / decrease the duration..
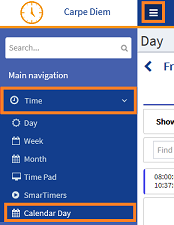
- This will open the CalendarView.
Complete the following steps to add a new entry in the CalendarView:
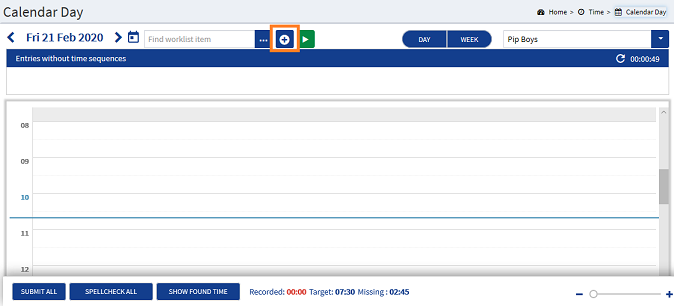
- Click the Add button only to the right of the Search WorklistWorklist items are defined in Tools > Worklist > Management. They allow you to setup a pre-populated time recording entry for regularly used client matters. They also allow you to define a narrative so you can simply enter time by selecting a worklist item and a duration with no other need to select details for the time entry. field to launch the Add Time form.

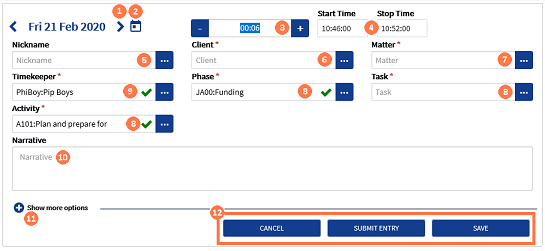
- The Add Time form is displayed:
 &
&  Where the date needs to be changed either:

Scroll date buttons : Click the < / > buttons to scroll the date one day at a time.
Calendar picker button : Click on the Calendar button to display the Calendar picker and select the date as required.

 In the duration field you can apply the duration in one of two ways:
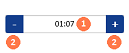
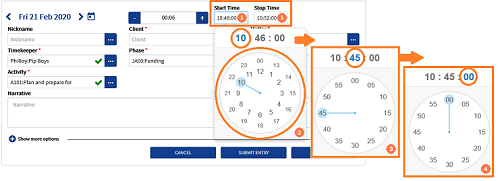
 Enter a Start and Stop time. These fields can be maintained either manually or by using the time pickers.
 Nickname : Where they have been defined in Tools > Nicknames , the time entry can be fully or partially defined by clicking on the ellipsis button and selecting the required nicknameNicknames are configured in Tools > Nicknames. They allow you to pre-populate a client matter for regularly used time recording entries. They can be fully or partially populated, though there is no narritive defined so you can do this at the point of recording time. You can also use a nickname item to create a Worklist item. from the list. This will then populate the ClientThis is the person for whom you are working on behalf of and has agreed to your terms of engagement., MatterThis is the type of engagement that the client has agreed for you to complete for them. Such as Family matters, Conveyancing, Wills, Deeds and Trusts etc. & UDFUser Defined Fields. These are the fields that are defined by the firm and are configured in AdminWeb by the system administrator.'s accordingly. Alternatively, you can populate the form manually, see points 6, 7 and 8 below.
 Client : Click the ellipsis button to display the list of clients then click on the required name to select it.
 Matter : Where the client has only a single active matter associated to them, this field will automatically populate. Where the client has multiple active matters then click the ellipsis button to display the list of the clients matters. Click on the required matter to select it.
 UDF's : Click the ellipsis button in each of the UDF's to display the list of options available. In some cases these fields may be dependant on other UDF's being populated first. E.g you must select the Country before you can select the City.
 Timekeeper : By default the timekeeperThis is the person who is working on behalf of the client. They are also known as a Fee Earner. is set to the current users name. Where the time entry is being added on behalf of another timekeeper, click on the ellipsis button and select the required timekeeper's name from the pick-list.
 Narrative : This field may be set as required by the firm. Where this is the case, enter the required narrativeThe narrative is a text field that will allow you to enter details about the time entry. This field will accept alpha, numeric ansd some special characters, as well as applying Glossary terms and the spell-check function. It may be that the firm has set this as a compulsory field. regarding the time entry. Glossary items can be applied within this field. You may also need to apply the spell-checker process.
 Show more options : Depending on how you have configured your Time form to be displayed, some of the fields from points 5 to 10 above may be displayed within this section. Click the expand button to show the secondary fields and complete as described above.
 CANCEL / SUBMIT / SAVE Buttons : If you wish to Save the time entry click the SAVE button, this will close the form and display the entry in the CalendarView for applied date. If you wish to Submit the time entry as complete then click the SUBMIT TIME button. If you no longer wish to save the time entry click the CANCEL button to close the form and return to the CalendarView.
