

Edit a Worklist Item
To edit a Worklist entry, do the following:
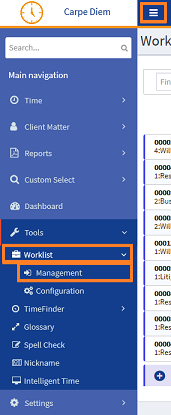
- From the Navigation menu select: Tools > WorklistWorklist items are defined in Tools > Worklist > Management. They allow you to setup a pre-populated time recording entry for regularly used client matters. They also allow you to define a narrative so you can simply enter time by selecting a worklist item and a duration with no other need to select details for the time entry. > Management.
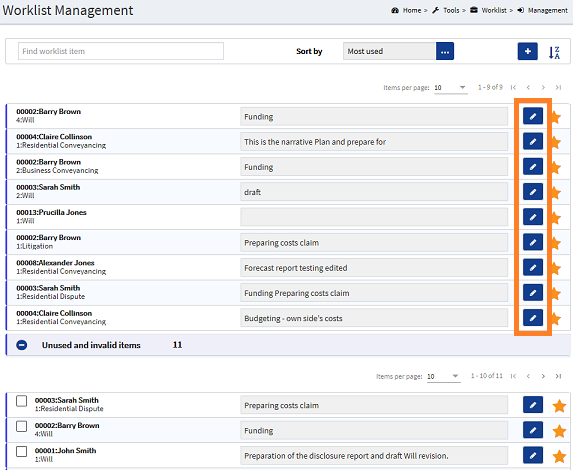
- The Worklist form is then displayed. Click the edit button for the entry you wish to change.
- The Worklist Management form will expand the entry to allow you to edit the details as required. Complete the following steps to edit the entry:
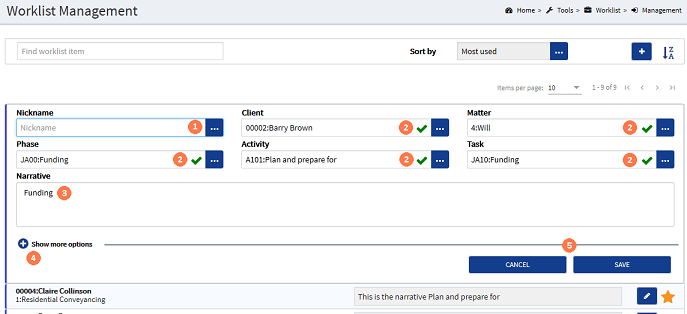
 Nickname : It is possible to edit the entire worklist by selecting an alternative defined nicknameNicknames are configured in Tools > Nicknames. They allow you to pre-populate a client matter for regularly used time recording entries. They can be fully or partially populated, though there is no narritive defined so you can do this at the point of recording time. You can also use a nickname item to create a Worklist item.. This will populate the Worklist item to match the nickname item, with exception to the narrativeThe narrative is a text field that will allow you to enter details about the time entry. This field will accept alpha, numeric ansd some special characters, as well as applying Glossary terms and the spell-check function. It may be that the firm has set this as a compulsory field.. To do this, click the ellipsis button to display the pick-list. Click on the required nickname to select it. This will edit the ClientThis is the person for whom you are working on behalf of and has agreed to your terms of engagement. / MatterThis is the type of engagement that the client has agreed for you to complete for them. Such as Family matters, Conveyancing, Wills, Deeds and Trusts etc. and UDFUser Defined Fields. These are the fields that are defined by the firm and are configured in AdminWeb by the system administrator.'s accordingly.
 Client / Matter & UDF's : You can add, edit or remove options from any of these fields. In some cases where the field selection is removed it may remove a selection from another field, as this was dependant on the removed data. To add or edit existing selections, click on the ellipsis button to display the required pick-list, then click on the required option to select it. To remove a selection, click in the field and manually delete the selected date using your keyboard.
 Narrative : The narrative can be added to, edited partially / entirely, or deleted. Click in the narrative and edit the content as required either manually or paste in any copied content where applicable. You can also run the spell-check now.
 Show more options : In some cases you may have fields showing in the Show more options section, depending on
 SAVE & CANCEL buttons : If you wish to save your changes, click the SAVE button. If you wish to retain the original details without committing any changes, click the CANCEL button. In both instances, this will close the edit view and return you back to the Worklist management view.
