

Copy a Time Entry in the Day / Week Views
- From the Navigation menu select: Time > Day.

Alternatively select the Week option rather than the Day option in the navigation menu.
To Copy a time entry in the Day / Week views, do the following:
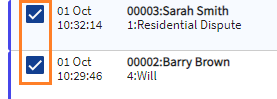
- Select the checkbox(s) for the time entry(s) that are to be copied to another date.
- The pop-up menu is displayed with the available functions and detailing how many entries have been selected.
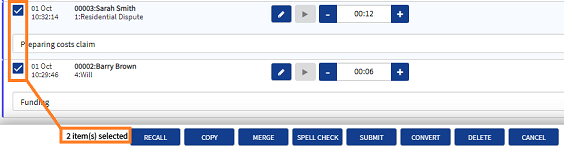
- Click the COPY button to display the pop-up Copy entries to date form.

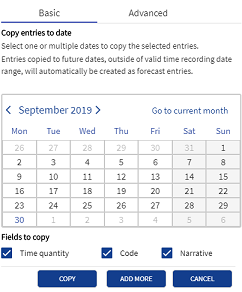
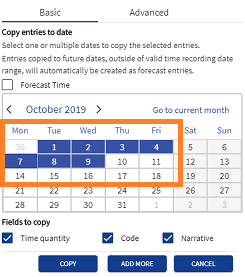
- The form will be displayed showing the Basic tab by default.
- Information is detailed at the top of the form to advise:
|
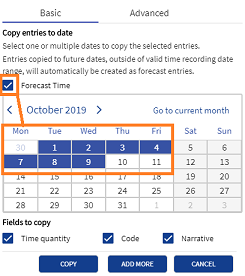
- In addition the user can create the copied time entry(s) as forecast timeTime in the future that has not yet happened but is planned. This will assist you in forward planning your work and lets your manager know when you are available. Forecast time can be converted into a Time entry when the work is completed., simply by selecting the Forecast Time checkbox and the required dates in the Calendar picker.
- There are 3 Fields to copy check-boxes that are also selected by default:
To retain the original entry details keep these selected. Alternatively, click on the non-required checkbox(s) to de-select that option. This may require the user to edit the copied time entry once it has been copied to the new date. The image below shows that the Narrative will not be included for the copied time entries.

- The Calendar section of the Basic tab allows the user to select one or more dates that the selected entry(s) will be copied to. This is simply done by clicking on each of the required days in calendar. If this is done in the Week view, the calendar will select the whole week when clicking on the day.

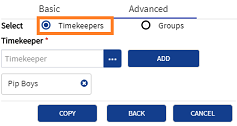
- It is also possible to copy the time entries to an alternative timekeeperThis is the person who is working on behalf of the client. They are also known as a Fee Earner. rather than the current user, or a group of Timekeepers. This is done by either clicking on the Advanced tab or the ADD MORE button in the form to display the Advanced tab.
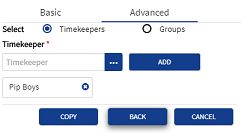
- By default the Timekeeper option is selected and the current timekeeper is selected. Additional individuals can be selected from the Timekeeper field, by clicking on the ellipsis button and then clicking the ADD button for each selection. This will display those timekeeper's names below the field. This will copy the time entry to those timekeepers.
This option will only show additional timekeeper names in the pick-list, where the current timekeeper has access to others. (these are configured by the firms system administrator and set by the user

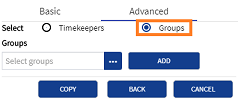
- Alternatively and where the current user has access to timekeeper groups, the selected time entries can be copied to a group of timekeeper's. This is done by selecting the Group radio button and then selecting the required timekeeper group from the pick-list. Clicking the ellipsis button will show those groups that the current user has access to. Once selected, those groups will be displayed below the pick-list field. This will copy the time entry to those timekeepers.
- Once the user has selected the required options to copy the time entry(s) to, then click the COPY button in the pop-up form. Once the entries have been copied a pop-up notification is displayed in the top right hand corner (where configured

- If the copy is not required click the CANCEL button to close the form without making any changes.
