

Dashboard : Forecast Tab
The Dashboard Forecast tab shows your future availability for a specified period.
The data is displayed Over 2 main tabs:
- Forecast Tracker
- Resourcing
The Forecast tracker shows a single doughnut graph to show your Forecast -v- Available time.
The Resourcing section is split into 2 sections:
- Participation
- Resource Builder
Here managers can set the correct resources to future planned work for specific timekeepers.
To view the Forecast tab, do the following:
- From the Navigation menu select: Dashboard.
- This will open the Dashboard view.
![]()
To view the Forecast tab details, do the following:
![]()
 Forecast Tab : Click the Forecast tab to show the Forecast tracker and Resource Builder accordions.
 Forecast Tracker accordion : Click the Forecast tracker accordion to expand the view.
 Period : From : By default this is set to today's date. Click the Calendar button to display the pop-up Calendar and select a date in the future if you do not wish to keep the current date.
 Period : To : By default this is set to today's date. Click the Calendar button to display the pop-up Calendar and select a date in the future if you do not wish to keep the current date.
 SHOW button : Click this button to show the doughnut graph.
 Chart results : The graph shows you the percentage of forecast timeTime in the future that has not yet happened but is planned. This will assist you in forward planning your work and lets your manager know when you are available. Forecast time can be converted into a Time entry when the work is completed. -v- Available time for the selected timekeeperThis is the person who is working on behalf of the client. They are also known as a Fee Earner. in the Select segment section of the dashboard.
 Key : Values : Standard chart key and percentage values.
To view the Resources, Participation accordion, do the following:
This section of the dashboard will display the selected timekeepers total forecasted hours and days for a set period.
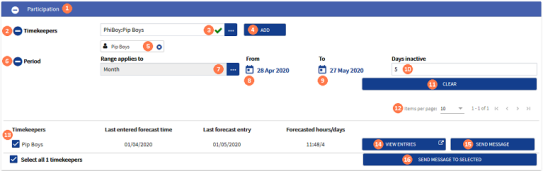
Resources : Participation accordion : Once you have clicked the Resources accordion the Participation accordion is displayed. Click the Participation accordion to expand the view.
Timekeepers toggle button : Click the Timekeepers toggle button to expand the form to display the timekeeper selection fields.
Select timekeeper : By default this field is set to NA, and if you click the SHOW button now, it will capture all active timekeepers that you have access to, and they have forecast time set. To select one or more specific timekeeper's, click the ellipsis button to display the timekeeper pick-list, then click on the required name to select it.
ADD button : When you have selected the name in the pick-list, click the ADD button to commit the selection.
Where you require multiple timekeepers, repeat steps, 3 & 4 until all timekeepers have been selected.
Selected timekeeper : On clicking the ADD button you will see the selected timekeeper name below the Select timekeeper pick-list. Where you have made a selection in error, you can remove the name by clicking the 'X' button in the selected name.
Period toggle button : Click the Period toggle button to expand the form to display the date range options.
Range applies to : There are multiple pre-defined ranges that can be selected which in turn will populate the From and To fields. Click the ellipsis button to display the pick-list, then click on the required range to select it. Alternatively you can apply a custom range by selection the last option in the pick-list.
 Range : From : When setting a custom range, click the Calendar button to display the calendar pick-list. You can scroll the calendar month by month, click on the date that you wish to capture time from.
 Range : To : When setting a custom range, click the Calendar button to display the calendar pick-list. You can scroll the calendar month by month, click on the date that you wish to capture time to.
 Days inactive : By default this is set to 5, to change this value, click in the field and enter the number of days required.
Once these fields have been completed, the form will expand to show the table of results.
 CLEAR button : If you click this button it will collapse the Timekeeper and Period toggles and reset the form back to its default setting. If any results have been captured, these will then be cleared and the table of results will be hidden.
 Paging : Where you have more than 10 timekeepers selected you can change the view to show 20, 50 or 100 rows. Alternatively you can page through the results using the < > buttons one page at a time. Alternatively you to jump to the first and last pages of results by clicking the |< and >| buttons.
 Table of results : The table of results will show each timekeepers results in a single row. It will advise of the first and last dates during the set period that they have forecast time entries in CDWeb, and the total number of hours / days that forecast time spans.
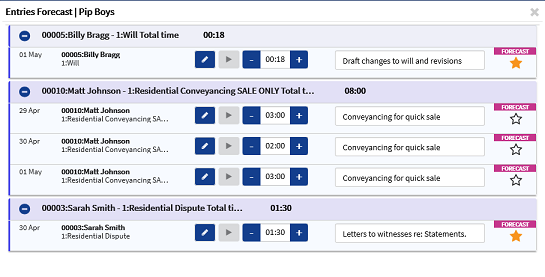
 VIEW ENTRIES button : If you wish to view the timekeepers Forecast time entries, click the VIEW ENTRIES button in the associated row. This will display a pop-up list of their forecast time.
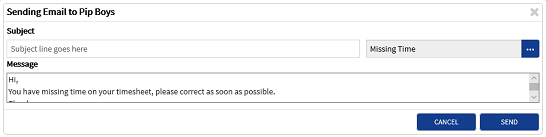
 SEND MESSAGE button : You can send a message directly from CDWeb to each individual timekeeper by clicking the SEND MESSAGE button. This will display a pop-up form. Here you can select a template where one exists and then your own subject, where you select a template the body text will auto-fill.
 SEND MESSAGE TO SELECTED button : This is the same as the SEND MESSAGE button but this will send the message to all of the timekeepers that you have selected the check-box for in the table of results. You can quick select timekeepers, by clicking on the Select all # timekeepers check-box.
To view the Resources, Resource Builder accordion and then the timekeepers Availability, do the following:
This section of the dashboard allows managers and users to view which timekeepers are available for specific dates, to aid in provisioning work accordingly.
Resource Builder accordion : Click the Resource Builder accordion to expand the form.
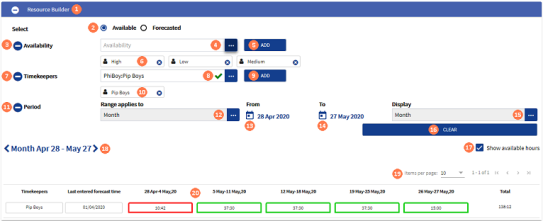
Select : This section of the form has a double use. In this instance keep the Available option selected.
Availability toggle button : Click the Availability toggle button to expand the form.
Select availability type : You must have at least one option selected from this pick-list. By default ALL of the options are selected. High, Medium and Low. Where you wish to add additional options, click the ellipsis button to display the pick-list, then click on the required option to select it.
ADD button : Once you have made an additional selection, click the ADD button to commit the selection.
Selected availability : Here the High, Medium and Low options are displayed that are selected by default. If you wish to remove an option, click the 'X' in the displayed name.
Timekeepers toggle button : Click the Timekeepers toggle button to expand the form to display the timekeeper selection fields.
Select timekeeper : By default this field is set to NA, and if you click the SHOW button now, it will capture all active timekeepers that you have access to, and they have forecast time set. To select one or more specific timekeeper's, click the ellipsis button to display the timekeeper pick-list, then click on the required name to select it.
ADD button : When you have selected the name in the pick-list, click the ADD button to commit the selection.
Where you require multiple timekeepers, repeat steps, 8 & 9 until all timekeepers have been selected.
Selected timekeeper : On clicking the ADD button you will see the selected timekeeper name below the Select timekeeper pick-list. Where you have made a selection in error, you can remove the name by clicking the 'X' button in the selected name.
Period toggle button : Click the Period toggle button to expand the form to display the date range options.
Range applies to : There are multiple pre-defined ranges that can be selected which in turn will populate the From and To fields. Click the ellipsis button to display the pick-list, then click on the required range to select it. Alternatively you can apply a custom range by selection the last option in the pick-list.
Range : From : When setting a custom range, click the Calendar button to display the calendar pick-list. You can scroll the calendar month by month, click on the date that you wish to capture time from.
Range : To : When setting a custom range, click the Calendar button to display the calendar pick-list. You can scroll the calendar month by month, click on the date that you wish to capture time to.
Display : This is how the results will be displayed in the table of results. If you select any defined Year range then this will default to Year. a Month range would default this field to Month, and Week range would default this field to Week. If you change this field then the Range applies to field will also change accordingly.
SHOW / CLEAR button : Once you have completed the fields above, click the SHOW button to display the table of results. This button will then toggle to show as the CLEAR button.
If you click the CLEAR button it will collapse the Timekeeper and Period toggles and reset the form back to its default setting. If any results have been captured, these will then be cleared and the table of results will be hidden.
 Show available hours check-box : If you wish to show the timekeeper's available hours in the results, click this check-box to display a tick.
 Results calendar : You can scroll the results by clicking the < and > buttons. When you do this the Range applies to will change the From and To dates to the year, month or week being displayed.
 Paging : Where you have more than 10 timekeepers selected you can change the view to show 20, 50 or 100 rows. Alternatively you can page through the results using the < > buttons one page at a time. Alternatively you to jump to the first and last pages of results by clicking the |< and >| buttons.
 Results table : The table of results will show each timekeepers available time per row. Each row will display available time bordered in green, those that are bordered in red are showing the timekeeper has no available for that period.
To view the Resources, Resource Builder accordion and then the timekeepers Forecast availability, do the following:
This section of the dashboard allows managers and users to view a timekeepers proposed forecasted hours.
Resource Builder accordion : Click the Resource Builder accordion to expand the form.
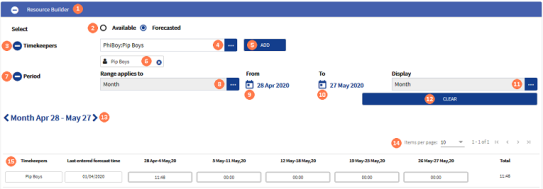
Select : This section of the form has a double use. In this instance select the Forecasted radio button. This will hide the Availability toggle options.
Timekeepers toggle button : Click the Timekeepers toggle button to expand the form to display the timekeeper selection fields.
Select timekeeper : By default this field is set to NA, and if you click the SHOW button now, it will capture all active timekeepers that you have access to, and they have forecast time set. To select one or more specific timekeeper's, click the ellipsis button to display the timekeeper pick-list, then click on the required name to select it.
ADD button : When you have selected the name in the pick-list, click the ADD button to commit the selection.
Where you require multiple timekeepers, repeat steps, 8 & 9 until all timekeepers have been selected.
Selected timekeeper : On clicking the ADD button you will see the selected timekeeper name below the Select timekeeper pick-list. Where you have made a selection in error, you can remove the name by clicking the 'X' button in the selected name.
Period toggle button : Click the Period toggle button to expand the form to display the date range options.
Range applies to : There are multiple pre-defined ranges that can be selected which in turn will populate the From and To fields. Click the ellipsis button to display the pick-list, then click on the required range to select it. Alternatively you can apply a custom range by selection the last option in the pick-list.
Range : From : When setting a custom range, click the Calendar button to display the calendar pick-list. You can scroll the calendar month by month, click on the date that you wish to capture time from.
Range : To : When setting a custom range, click the Calendar button to display the calendar pick-list. You can scroll the calendar month by month, click on the date that you wish to capture time to.
Display : This is how the results will be displayed in the table of results. If you select any defined Year range then this will default to Year. a Month range would default this field to Month, and Week range would default this field to Week. If you change this field then the Range applies to field will also change accordingly.
SHOW / CLEAR button : Once you have completed the fields above, click the SHOW button to display the table of results. This button will then toggle to show as the CLEAR button.
If you click the CLEAR button it will collapse the Timekeeper and Period toggles and reset the form back to its default setting. If any results have been captured, these will then be cleared and the table of results will be hidden.
Results calendar : You can scroll the results by clicking the < and > buttons. When you do this the Range applies to will change the From and To dates to the year, month or week being displayed.
Paging : Where you have more than 10 timekeepers selected you can change the view to show 20, 50 or 100 rows. Alternatively you can page through the results using the < > buttons one page at a time. Alternatively you to jump to the first and last pages of results by clicking the |< and >| buttons.
Results table : The table of results will show each timekeepers available time per row. Each row will display the total hours that have been forecasted for the timekeeper. Unlike the Available search results, these results are not colour coded.
Also see:
