

Timesheet Day View
The Day tab displays each time entry for that day only unless the Multi-Day View option is selected.
Where the header option is not displayed it can be enabled in:
The Day view is the default view on launching CD Web, unless you have configured the CalendarViewThis view will display the timesheet in a chronological order. It holds all of the same functions as the standard Day view but offers alternative methods for Merging time entries. You can also drag items to increase / decrease the duration. to be the defaults. Where you are in another screen within CDWeb, do the following to open the Day view.
- From the Navigation menu select: Time > Day.

- This will display the Day view.
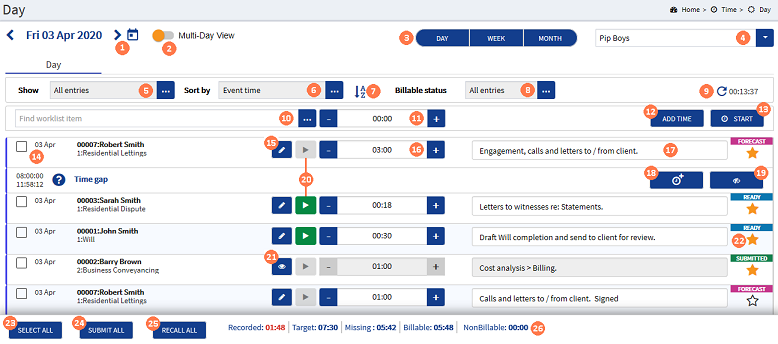
 Date picker : You can scroll day by day by clicking on the < > buttons. You can also select an alternative day by clicking on the Calendar button and making a selection from the pop-up calendar picker.
 Multi-day view switch : If you wish to switch the view to show the Multi-day view, click and slide the button right.
 Switch view buttons : If you wish to change the view away from the Calendar view, click either the WEEK or MONTH buttons.
 Timekeeper picker : By default the current timekeeperThis is the person who is working on behalf of the client. They are also known as a Fee Earner. is selected and the view shows their day view. You can view an alternative timekeeper's day view list. Click on the drop-down button and select the relevant timekeeper name from the list.
 Show : By default this is set to All entries. You can change this to show only specific time entries by their status type. In addition you can also select, All open entries or All entries that are Non forecast timeTime in the future that has not yet happened but is planned. This will assist you in forward planning your work and lets your manager know when you are available. Forecast time can be converted into a Time entry when the work is completed. entries. To select an alternative option, click the ellipsis button, then click on the required option to select it. The view will then refresh and show the view as selected.
 Sort by : By default this is set to Duration. You can also sort the view by client matter or status. To change the view, click the ellipsis button, then click on the required option to select it. The view will then refresh and sort the view as selected.
 Order : Click this button if you wish to change the list order, either ascending or descending in order.
 Billable status : By default this is set to All entries. You can change the view to only show your time entries that are either billable or non-billable. To change the view, click the ellipsis button and click on the required option to select it. The view will then refresh to only display the applicable entries.
 Refresh : If you wish to refresh the Day view, simply click the refresh button. This will also reset the auto refresh timer that is displayed. The auto refresh timer is set by the system administrator.
 Find worklist item : If you wish to add time in the Day view you can use the WorklistWorklist items are defined in Tools > Worklist > Management. They allow you to setup a pre-populated time recording entry for regularly used client matters. They also allow you to define a narrative so you can simply enter time by selecting a worklist item and a duration with no other need to select details for the time entry. items to assist in quick time recording (where you have configured worklist items, this is done
Where you do not wish to use a worklist item, or you do not have any configured, you can simply use the duration and ADD TIME or FORECAST time buttons to add time in this view.
 Duration fields : If you wish to enter the duration for your time entry within the Day view, you can click in the duration field and enter the time value. This must be in the correct format as defined in
 ADD TIME button : The ADD TIME button can be clicked independently of selecting a Worklist item and / or defining any durations in the Day view. Where this is done, the Add Time form is opened.
![]() View the Add Time form details:
View the Add Time form details:
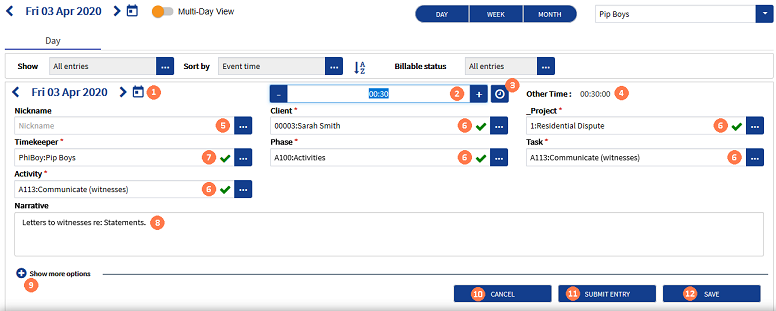
 SAVE button : If you wish to save your time entry without submitting it, click the SAVE button. This will close the form and save your time entry to the week view list. It will be saved with a status of either Incomplete or Ready according to the firms validation rules.
 FORECAST button : Just like the ADD TIME button the FORECAST button can be uses alongside the Worklist item's and the duration field in the Day view. However you can simply click the FORECAST button and complete the form in the same manner as the Add Time form. In this instance though, you cannot submit your time entry, it can only be saved with a status of Forecast or you can cancel the time entry and close the form (see step 12 above to complete the form fields). Only time entries for a future date can be created with a status of Forecast.
 Select entry check-box : If you select one or more entries by clicking the individual check-boxes, a pop-up menu will be displayed so that you can do the following: (click on the buttons in the image to jump to the relevant topic).

The CANCEL button will simply close the pop-up menu and deselect the selected check-boxes in the week view list.
 Edit button : If you have saved a time entry and you need to edit the entry then click the Edit button. This will expand the time entry in the week view. You can then add, remove or change any of the details in the edit form. Any time entries that were marked as Incomplete or Ready can be edited and then you can submit the entry or simply save it. If you click the CANCEL button it will retain the original details of the entry and close the form. Any time entries that are submitted from the edit time form, will only be submitted where they pass validation. Any entries that do not pass validation, will be marked as Incomplete in the day view list and you will need to edit those entries again before you can re-submit it.
 Time recorded : Duration fields : This is the duration that has been recorded so far for the time entry. You can add, remove or edit these values directly within the day view list. To do this, simply click the decrement or increment buttons or, click in the field and manually enter the required time (in the correct format).
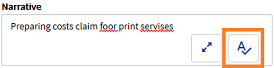
 Narrative : Just as you can edit the duration for a time entry in the day view list, you can also edit the Narrative in the same way. Simply click in the Narrative field and the field will expand. Edit the current narrative or enter one where the field is empty, then spell-check it.

Once the spell-check has completed the Save and Edit buttons are displayed. Click the Save button to save your changes, or click the Edit button to activate the field again to allow you to make further edits.

 Time gap : Add Time button : Click this button if you wish to enter time that has been captured as a time gap. This time that has been captured since the previous time entry was entered. See the Convert Time Gap topic for more information.
 Time gap : Hide button : If you do not wish to see the Time gap in the Day view list, click this button. The time gap will be shown again if you refresh the page or the auto-refresh executes.
 Timer button : A timer can only be run for entries that are marked as Incomplete or Ready. These timers are displayed as green buttons. Clicking the timer will disable the row and show time accruing. While accruing it will show a red stop button
  . Click the stop button when you finish the task to enable the row.
 View time button : Where a time entry has been submitted or transferred you cannot edit the entry but you can still view it. Click this button to view the time entry details. This will expand the form but in disabled mode. If required those entries marked as Submitted it can be recalled if you need to edit them. However, any time that is showing as Transferred cannot be recalled.
 Worklist item button : The star button state shows if the client matter is a Worklist item. Where it is displayed as a Gold Star this is a Worklist item. Clicking the Gold Star button will delete the Worklist item. Where configured
 SELECT ALL button : Click this button if you wish to select all of the entries in the week view list to display the pop-up menu. See step 14 above for more details.
 SUBMIT ALL button : If you wish to submit all of the time entries in your Day view list, click the SUBMIT ALL button. On clicking the button all entries that have not been submitted will be captured and a submission will be attempted. Any entries that are marked as Incomplete or Ready will be captured in this process. Where configured
 RECALL ALL button : Only those entries that are marked as Submitted can be recalled, any that are marked as Transferred cannot be recalled. To recall all of your submitted time entries in the Day view list, click the RECALL ALL button. Where configured in Settings > Confirmation & notification a green pop-up message will be displayed to advise how many entries were successfully recalled.
 Weekly totals : This section of the Day view is for information purposes and will show the totals by status. Where enabled
